With the rise in concepts such as Big Data, the need to collect data in a structured manner has become one of the most important topics right now. With using web scraping we can achieve collecting data in a more formatted manner. Now lets dive in deeper “How To Scrape the Web with Node Js”.
The extracted data further can be used for many different purposes such as, providing valuable insights about trends from analysing data, database creation etc.
If you are a developer or remotely anyone who has some sort of relation with computer programming, you would have definitely heard the importance of JavaScript. Now commonly, Javascript and its famous framework Node JS is more famous for the utilities it provides for web development, but very few know that Node JS can actually help out with Web Scraping tasks as well. Follow the steps below to start web scraping with Node JS.
What is Web Scraping?
Web Scraping is like programmatically extracting data from the websites. It is done by making HTTP requests to firstly obtain the HTML page content from a target URL. Then parsing the HTML code to extract out the relevant content in a more structured or you can say formatted manner, such as CSV or JSON.
Web Scraping is popular in fields like e-commerce, finance and especially research sectors, because these are the sectors where decisions are actually data-driven.
Some common ways web scraping can be used are:
Price Comparison:
Scraping product prices from different websites to find the best price deals for a particular product.
Sentiment analysis:
Customer reviews can be scraped to find the public opinion on a particular topic, use of NLP can be done to get the statistical analysis of the data.
Market research:
Scraping industry trends, competitor data, or consumer behavior to gain insights into the market
Webscraping with Node JS
Node.js is an open-source, server-side JavaScript runtime environment which is built on Chrome’s V8 JavaScript engine. The thing that makes Node JS one of the best tools for scraping is its ability to execute JS code outside of the web browser.
You can use Libraries such as Axios or Request for handling the HTTP request and responses. Here’s a simple way you can make a GET request to a website and print out the response body.
					const http = require('http');

http.get('http://example.com', (res) => {
  let data = '';

  // A chunk of data has been received.
  res.on('data', (chunk) => {
    data += chunk;
  });

  // The whole response has been received. Print out the result.
  res.on('end', () => {
    console.log(data);
  });

}).on('error', (err) => {
  console.error(err);
});
Explanation:
The code above uses the HTTP module of Node JS to make a GET request on a website, you can change the target url. It listens for the data event on the res object using the on method. Once it receives it it adds the chunk(obtained data) and stores it into the data variable, then it prints out it.
Headless Browser Web Scraping with Puppeteer
Puppeteer is a Node.js library which is well developed by Google, which allows developers to control headless Chrome or Chromium browsers programmatically. Nowadays Puppeteer has actually become the main go to tool for web scraping.
Here is a step by step guide on how to perform a simple web scraping using Puppeteer
1. Know your Target Website
All websites don’t have the same structure. Every website has a unique HTML structure and a unique way the data is actually presented. The first and foremost step for you is to actually spend some time understanding the structure of your target website. For this tutorial we are assuming we want to scrap a popular ecommerce website called Amazon. Let’s suppose we want to scrap something from the Amazon store.
2. Make Sure you have Node js Installed on your device
If Node JS is not installed on your device, make sure to check out their official site and download the setup according to your device specifications.
Once installed run the following command in the CMD to cross check whether the Node JS is really installed or not.
node -v
3. Setup the Environment
After installing the Node Js, you need to set up your environment ( the project folder). Just create a folder for your project, name it anything you like, then navigate to that folder and open cmd in it and run the following command.
npm init -y
Afterwards, install puppeteer using the npm install command.
npm install puppeteer
Now, open that project folder into any of your liking Code Editor.
4. Code!
Here’s what the code looks like:
					const puppeteer = require("puppeteer");

async function scrap() {
  let browser;

  try {
    // Launch the browser
    browser = await puppeteer.launch({ headless: "old" });

    // Create a new page
    const page = await browser.newPage();

    // Navigate to Amazon
    await page.goto("https://www.amazon.com/", {
      waitUntil: "networkidle2",
      timeout: 30000,
    });

    // Wait for the search input field
    await page.waitForSelector("#twotabsearchtextbox", { timeout: 5000 });

    // Search for a specific item (modify this to your desired search term)
    const searchTerm = "monitor";
    await page.type("#twotabsearchtextbox", searchTerm, { delay: 100 });
    await page.click("#nav-search-submit-button");

    // Wait for the search results
    await page.waitForSelector('[data-component-type="s-search-result"]', {
      timeout: 5000,
    });

    // Extract search results
    const searchResultsElements = await page.$$(
      '[data-component-type="s-search-result"]'
    );

    // Delay for demonstration purposes
    await new Promise((r) => setTimeout(r, 10000));

    const searchResultsData = [];

    // Process each search result
    for (const resultElement of searchResultsElements) {
      const titleSelector =
        'div[data-cy="title-recipe"] h2 a span.a-size-medium.a-color-base.a-text-normal';
      const priceSelector = ".a-price span.a-offscreen";

      const title = await resultElement.$eval(titleSelector, (el) =>
        el.textContent.trim()
      );

      const price = await resultElement.$eval(priceSelector, (el) =>
        el.textContent.trim()
      );

      // Store result data
      searchResultsData.push({
        title,
        price,
      });
    }

    // Display the results
    console.log(`Search results for "${searchTerm}":`, searchResultsData);

    // Close the browser
    await browser.close();
  } catch (error) {
    console.error("Error during execution:", error);
  } finally {
    // Close the browser in case of any error
    if (browser) {
      await browser.close();
    }
  }
}

// Call the run function
scrap();
Explanation:
The above mentioned code makes use of the puppeteer module, it defines an async function called scrap which does the following things:
- Browser Launch To start, it uses the puppeteer to open a browser.starting method, giving it the option to run without a GUI (graphical user interface).
- Make a New Page Next, it uses the browser to make a new page.the newPage method.
- Navigate to Amazon The function uses the page.goto method to go to the Amazon website. It takes a URL and gives you the option to set a timeout and wait until the network is idle.
- Wait for Search Input Field The page is used to wait for the search input field to show up.You can use a CSS selection and set a timeout with the waitForSelector method.
- Do a Search The function uses the page to type a search term (like “monitor”) into the input field.You can give a selection, a string, and a wait when you type method. The page then has a search button that it clicks.use the click method with a given selection.
- Separate Search Results Next, it uses the page to separate the search results parts.$$ method to get a list of element handles that meet a certain filter.
- Set Up Data Array The code sets up a blank array to hold the search returns data.
- Extract Title and Price The elementHandle.$eval method is used to get the title and price of each search result. This method runs a code on an element, gets the result, and adds the data to the array.
- Display Results The data from the search is then shown on the console using the console.log method and a template literal that contains the search term and the array.
- Browser Closure And finally, the browser is shut down using the browser.method to close.
Suitability for Usage:
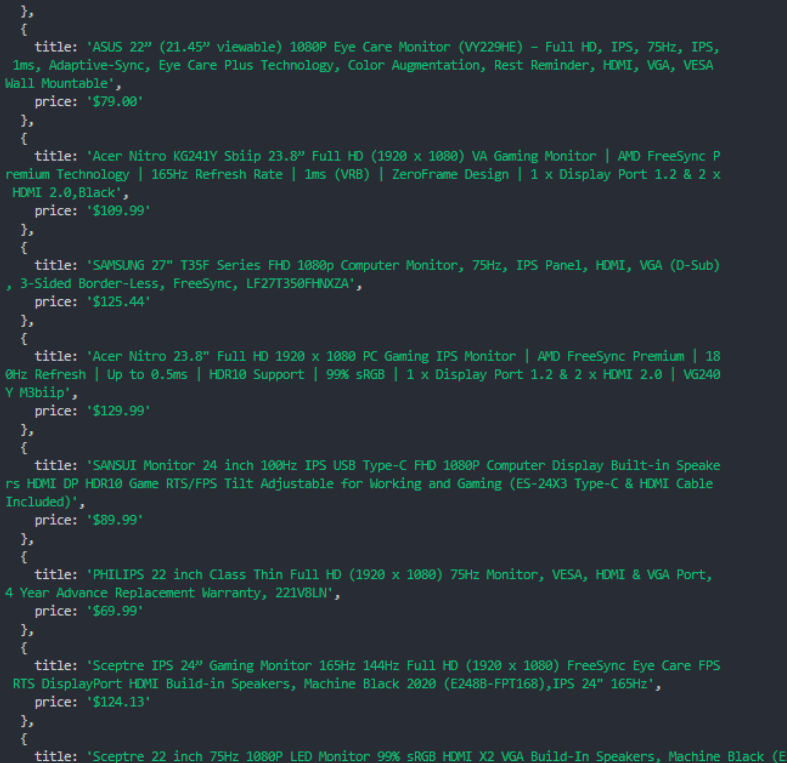
This code is just a simple way on how you can use Puppeteer to perform a simple web scraping task. It just makes use of the basic method of Puppeteer, you can add many more filters into it like for instance price filter or a color filter, stuff like to mold it according to your needs. And it displays the results by logging them on console, you can firstly use pagination to extract data from than one page and then instead of just logging it you can store this on a csv file so it is more structured.
Output:
Web Scraping is Challenging
Now what we have done so far is a simple scraping, and most of the time it can get your work done, but if you want to scrap on a relatively larger level, there are tons of challenges that stand in your way, fortunately enough some of the problems can be solved by using Proxies.
Such as:
IP Blocking and Rate Limiting
Since web scraping includes frequently sending HTTP requests to the target website. This can lead to the target website detecting the activity and blocking the frequent and aggressive request from a single IP address. What this can lead to is IP bans or rate limits, which well then reduces the number of requests that you can make within a time period. Luckily for you, you can use rotating proxies that frequently change their IP address, this makes target website detection fail, as the HTTP requests are being made from different IP addresses.
Geographic Restrictions
Online stores and websites are really handy, but if that website is not available in your geographic region, it can lead to frustration right? One of the things you can do is again use a simple proxy with an IP address associated with a geographic location that has access to the target’s website. This can help you bypass geographic restrictions.
Captcha Challenges
In order to avoid spamming a lot of websites use Captcha systems. Captchas are sort of the test that require human input for instance just typing an input, solving a puzzle or clicking on the right kind of images. These are intended to detect and block out the automated bots.
Captchas can interrupt and slow down web scraping processes, and may require additional solutions to overcome. A possible solution to this challenge is to use proxies that can help distribute requests across different IPs, making it more difficult for websites to detect and impose captchas.
Which Proxy to use?
If you are looking for a Proxy service, Petaproxy should be your topmost priority. Petaproxy provides you with HTTP and SOCKS5 that you can use for various online tasks, such as SEO, social media, and data scraping. With Petaproxy, you can enjoy:
- Diverse Proxy Options: Choose from a wide option of mobile proxies and datacenter proxies to suit your online needs.
- Unparalleled Reliability: Avoid service interruptions and lagging connections with high uptime and smooth performance.
- Competitive Pricing: Get quality services at affordable prices that offer great value for money.
- Expert Support: Get help from our dedicated support team anytime, whether you’re a beginner or an expert.
Conclusion
Explore the power of web scraping with Node.js and Puppeteer in this guide for beginners. Finding out the basics, looking at real-life cases, and solving problems can be done with the help of proxies, especially Petaproxy, which offers a wide range of choices at a reasonable price. Don’t stop collecting info!